Showing posts with label christmas. Show all posts

Tuesday, December 3, 2024

Christmas at the Barn Tablescape

 Welcome to my Christmas Table, this year we are celebrating at the cutest red barn!

This is what I think of when imagining all Christmas tree farms! After all - they all look like this on Hallmark movies, don't they?!!

I am joining 14 other table stylist in our Christmas Tablescape Hop today!  Once again, Rita from Panoply has gathered a group of us together to celebrate the season the way we like to best - with pretty tables!!

All the links to the other blogs are at the end of my post - Please show everyone some love by visiting and commenting on your favorites!!  We are all thrilled with an acknowledgment of our creations.

🎄🎄🎄🎄🎄🎄

We are out at the barn this Christmas with lots of evergreens.

These plates are from Hobby Lobby, I bought the small plates early - thinking I could pair them up with some base plates that I had from my stash.  

Well, that didn't work!  

Of course by  the time I decided I wanted to go back and get the dinner plates that coordinate, it was slim pickings.  

Tuesday, December 5, 2023

Christmas Nutcracker Table

 Christmas season is upon us and we are decorating our homes to welcome friends and family during this time of peace and joy.  

Today I am sharing my Christmas Plaid and Nutcracker Table with you as I participate in our annual Christmas Tablescape Blog Hop.

Saturday, December 10, 2022

Christmas Card -Sounds of the Season -Stamping INKspiration Blog Hop

Today we are sharing cards that depict the Sounds of the Season.

I chose the beautiful Peace to You stamp set for my offering to the Stampin INKspiration Blog Hop.  Make sure you check out the links to all of the talented card makers at the end of my post to see what song and stamp set they used.

Tuesday, December 6, 2022

Dreaming of a Christmas White and Sweet - Christmas Tablescape Hop

 What is better than a white Christmas filled with sweet treats and friends and family to share it with?


It's that time of the year where I join my blogging friends for a Christmas Table Hop!
So put on some Christmas music and sit back with a cup of cocoa and check out all the different Christmas tables!!  All of the links to the other creative table stylists are at the end of my post.

Thursday, November 10, 2022

Festive Season OSAT Hop- Cottage Wreaths

 It is time to start on all those Christmas projects you have in your head! 

 This is one of mine!

  I have been wanting to try a sort of floating sampler of sorts as a framed piece of art.  I used this as my 3D project for this month's OSAT Blog Hop.

This month's One Stamp at a Time Blog Hop's theme is Festive Season.  We were all to make a card and a 3D project with a festive holiday feel to them.


 I made a twelve days of Christmas wreath sampler using the Cottage Wreaths Bundle and a beaded edged board I purchased at Hobby Lobby.  I stuck with the color pallet of Evening Evergreen, Soft Succulent, White and gold.  
I used the Deckled Rectangles Dies for my backgrounds and ran a few of them through various embossing folders, some I left plain and some I flicked some Evening Evergreen die on them with my Water Painter brush.  

I used the Country Wreaths Dies that come in the bundle to cut all of the wreaths, extra branches and the bows out.  Several were stamped - the leafy wreath stamps out with some beautiful shading that leaves the leaves looking light and dark,

I added a few ribbon and twine bows and some gems to give each wreath a very different look.

It is kind of hard to see all of the details in this photo - but there is a lot of texture to each wreath.
I popped up each of the 12 pieces with dimensionals to give the piece some depth.

🌲🌲🌲🌲🌲🌲
The card I made matches the 12 Wreaths of Christmas framed piece.
I used the Cottage Wreaths Bundle again - along with the Christmas Banners Bundle.  I started with an Evening Evergreen base,  a layer of Evening Evergreen run through the  Time Worn Type Embossing folder.  I cut a piece of Gold Foil with the Deckled Rectangle Dies - but ran it through a second time to make the piece more square, and did the some for the next size down die with Basic White Cardstock.
  
Adding my stamped and cut wreath and my stamped and cut Merry Christmas, I used dimensionals to pop them up.  I finished off the card with the gold bow and some Champagne Gems. 

This is just a classic looking Christmas Card with that touch of elegance.  

This is going to be a small hop this month - so please take the time to look at what other Seasonal Projects have been created by the other participants! 

Thursday, July 14, 2022

OSAT Time to Saleabrate - Christmas in July

 Welcome to more Christmas in July here at Corner of Plaid and Paisley!

Today I am participating in the OSAT Time to Celebrate Blog Hop!

Which means I was challenged to do a card and a 3d item with the current Sale-abration items for this month's theme.

I am using two different Sale-abration items with both my card and my tea light box.

Saturday, July 9, 2022

Window Wishes - Christmas in July Color Challenge - Stamping INKspirations Blog Hop

 Welcome to my Christmas in July Color Challenge card for the Stamping INKspirations Blog Hop.  I chose the new Window Wishes Bundle from the July-December Mini Catalog to use for my card.  


The Stamping INKspiration's Hop is mixing things up a bit with this Christmas in July Theme-

  We had the choice  of a cold color pallet or a warm color pallet. 

Tuesday, December 7, 2021

Evergreen and Gold Classic Christmas Tablescape

 Welcome to my Christmas Table! 

I am so excited to be here with all of my talented tablescaping sisters!  Rita from Panoply has put together another fabulous table hop just in time to give you lots of inspiration for your Christmas celebrations.

All of the links will be at the bottom of my post, be sure to check out all of the wonderful tables involved!

I chose to do a classic evergreen and gold theme with a nativity scene as the centerpiece.

Thursday, November 11, 2021

Snow Flake Card and Ornament - OSAT Season of Cheer Blog Hop

 Snowflakes are a big part of our Season of Cheer here in Ohio!  We don't really have to dream of a white Christmas, more often than not - we have snow on Christmas here!

So I made a snow card and a snowflake ornament for this month's One Stamp at a Time Season of Cheer Blog Hop!

The card is a double Z fold with a circle cut out and a snowflake hanging from some fishing line! My husband is an avid fisherman, so fishing line is a staple at my house.  This DSP is absolutely gorgeous and my photos don't do it justice!  This cards has a lot of shine and shimmer to it.

  I used the Stitched Snowflake dies, the Layering Circles Dies, the Seasonal Labels dies, Night of Navy Cardstock, Basic White Cards Stock, the gorgeous Peaceful Place 12 X12" Designer Series Paper, some white Stampin' Emboss Powder  and a few Rhinestone Basic Jewels.  The sentiment is from the Peaceful Deer stamp set.

❄❅❄❅❆❅❆❄❅❆❅❄

Since this hop is all about a card and a 3D item - I made a 3D snowflake ornament that coordinates with the card.

This was made with 4 die cut snowflakes folded down the middle and glued back to back with a piece of fishing line glued down the middle.  The outside was made with the Layering Circle dies - two blue and one white scalloped circle sandwiched in the middle.   The little tags is cut with a die from the Ornate Frames die. The bow is made from the White 3/8" glittered Organdy Ribbon.

I hope you enjoyed these projects.  
Please check out all of the other talented paper enthusiasts with their offering for Season of Cheer!


Tuesday, July 20, 2021

Christmas in July - Part 2 of 3 Gingerbread & Peppermint

 Welcome back for more Christmas in July!!  I must have Christmas cookies on the brain!

This is a sneak peak at some of the new Christmas products being offered starting August 3rd.

I can't stop making Christmas cards with yummies as the theme!

These cards are made from the new Gingerbread & Peppermint 6" x 6" Designer Series Paper.
This is such a fun pack to mix and match, the possibilities are endless!

Saturday, July 10, 2021

Christmas in July - Stamping INKspirations Blog Hop

Happiness is homemade Christmas Cookies, even if this is July!?!

Here is a great little gift idea to make for your favorite baker!!

This is all part of Christmas in July with the Stamping Inkspirations Blog Hop.

Wednesday, November 25, 2020

Quite Curvy Christmas Card and Tag

 This card has been a favorite with my creative friends, so I thought I would share the details to the Quite Curvy Christmas Card.  I also made a tag to match that I am sharing as well.


  • The card base is a standard A2 Card in Cherry Cobbler Cardstock. 
  • Cut two pieces from the Classic Christmas 6X6 Paper  -about 2 to 2 1/2" with the Quite curvy Dies. Trim to 5 1/4" long.
  • Cut one piece of white card stock 2" X 5 1/4" 
  • Layer the three pieces on your card front and adhere - I like to use the Liquid Glue because you have a tiny bit of time to shift them into place - unlike tape.
  • Cut 2 of the small boughs, and one of the medium boughs out of Garden Green Card Stock and adhered in a cluster.
  • Cut a 12-14" piece of the Metallic Mesh Ribbon and cut it long ways - about one third of the width so that you get a nice long thin piece of mesh, loop it several times and adhere on top of the boughs with tape or  Stampin' Seal
  • Cut three stars from the Stitched Stars Dies - I did a variety of sizes - I ran each of these stars through an embossing folder to give the stars some texture and adhered them with Dimensionals, Place your big star over where you adhered your mesh to cover up the messy part!
  • Stamp your sentiment in Cherry Cobbler - the sentiment I used is from the  Wrapped in Christmas stamp set.

Here are the items I used for this card:

The Softly Falling Textured Embossing Folder is a retired item.


★★★★★★★★


The tag is quite similar  - 
  • The top layer is the Tag Die from the North Pole Wonder Dies 
  • The second layer - Whisper White Cardstock - Measures 2 1/4" x 4 1/4"  - I clipped the corners off - just with scissors - nothing fancy
  • Stamp the To and From - I used the Tag Buffet Stamp set - In Cherry Cobbler - the star stamp on the bottom is from the Quite Curvy Bundle- called Curvy Christmas.
  • The Back layer is 2 1/2"  X  4 1/2"
  • Punch a small hole in the top of all three layers and thread some ribbon through the hole and tie those with another small piece of ribbon.
★★★★★★★★
I hope you enjoyed these Christmas projects.
These can be made with any coordinating paper - the white stars can be changed out for silver stars as well.  That is what is nice about our products - they all coordinate together so it isn't hard to find patterns and colors that go well together.

My online Shop is open 24/7 - just go to the store front on the side - or the Shop with Me at the top!
If you spend $35 or more, Please use my Hostess code - If you do, I will send you a variety of 6 X 6"  Designer Series Papers.  Once you purchase over $150.00 you do not have to use the hostess code and you will receive 10% back in products of you choice as Stampin'  Rewards from Stampin' Up!

Would you like to receive 20% off on all of your purchases?
Sign up to be a demonstrator!!  It is a $99 investment - you choose $125 in products.  
Even if you don't want to sell anything, we have a lot of hobby demonstrators.
If you have questions about becoming a demonstrator - just email me!
I will be happy to help you.

 
Follow me on Facebook @ Corner of Plaid and Paisley 
and on Instagram at annatcpp


Wednesday, November 18, 2020

Stampin' Dreams November Blog Hop - Christmas Project


Welcome to the Stampin' Dreams Blog Hop for November where we are featuring Christmas projects for you to enjoy!  I am Ann Krucek, from Malvern, Ohio, USA.
I really love the Heartwarming Hugs Designer Paper and have had so much fun designing different Christmas projects featuring this DSP.  With a blog name like Corner of Plaid and Paisley - you would have to know that I was drawn to the cute red and green plaid!  
The card on the left was made with the Arrange a Wreath bundle featuring the partridge and its's pears.
The pizza box in the middle uses the Arrange a Wreath as well, along with the Joy Dies.
The little treat box is made with the Little Treats Bundle.  

Here is a closer look at the card.

I used two different embossing folders with each of the Whisper White layers to give the card an interesting layered look with lots of texture.  I also used three different colors in the wreath, a layer each of Garden Green, Pear Pizzaz and Mossy Meadow, this gives the wreath a lot of dimension.  The sentiment is from the Dove of Hope set.  

I hope this gives you a few new ideas for some Christmas projects.
As always my online store is open 24/7 - just click on the store front on the side bar.
If you have any questions, please don't hesitate to send me a message.

You can find me on Facebook as well @ Corner of Plaid and Paisley or on Instagram as Annatcpp.

Please click on the InLinkz tab to find all the great links to more Christmas ideas from some wonderful Stampin' Up! demonstrators from all over the globe.

You are invited to the Inlinkz link party!

Click here to enter

Wednesday, September 16, 2020

Stampin' Dreams Blog Hop September 2020, Our Favorite Season

 Welcome to Corner of Plaid and Paisley.  I am Ann from Ohio, USA.   I am part of the Stampin' Dreams Blog Hop today showing off cards that depict our favorite seasons. 
 I have a hard time choosing between Fall, Halloween and Christmas. But Halloween was so fun when I was a child that I think those memories have stuck with me the most.
This slimline card using the Coming Home Bundle reminds me of the fun we had Trick or Treating in our neighborhood.  Back then we went at night and it was spooky dark out!!  We had a blast running from house to house collecting candy in our costumes.
These houses were stamped with Momento Black Ink and colored in with Stampin' Blends.
The sentiment and the tree branch, bats and moon is from the Goulish Goodies Stamp Set.

★★★★★★★★★
Since not everyone celebrates Halloween, I thought I would include the winter scene card I made with this same set as well.
The dimensions of my slimline card is an 7" by 8 1/2" piece of cardstock scored and folded in half to make it 3 1/2" X 8 1/2"  card that will fit in a legal size envelope. (At lease that is what we call it in the United States - I am not sure what it maybe called in other countries)
Same set, same idea, just very different colors give it a very different look!
The sentiment stamp is from the Poinsettia Petals stamp set. 

These were fun to build the scenes, especially with the slimline card since it gives you more space to fit a scene across the card.  


Take a look at the other cards that have been created by my fellow stampers by clicking on the Inlinkz link party below!!!
They are all sharing their favorite seasons as well!

You are invited to the Inlinkz link party!

Click here to enter

Monday, December 2, 2019

Christmas Tablescape Toile and Tin

Christmas is coming!  Fast this year!
Since Thanksgiving was so late.  We have officially put away all the pumpkins and started our Christmas Decorating.  I was excited to start with this table for Chloe Crabtree's Christmas Tablescape Blog Hop.  This hop starts today and runs through Friday, featuring 23 different Christmas Tables throughout the week.  I will have the links to all of the wonderful bloggers that are participating at the end of this post.
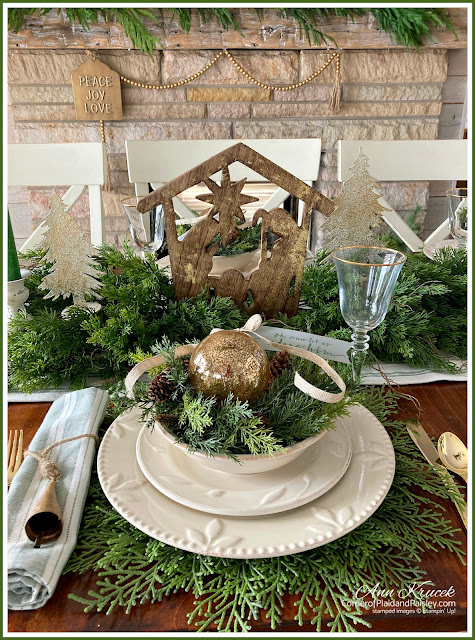
My table is full of Toile inspiration and galvanized metal pieces.  I decided to just call it tin, even though my Metallurgical husband says it technically isn't tin - it is probably more zinc! and my table cloth and dishes are technically not Toile but it reminded me of a toile pattern -  but I used all this just for a nice title to my post!!
 The base of my table is an April Cornell print Tablecloth.  I had just been working with some Toile paper - as you can see in my last post here - so this tablecloth just called out to me in HomeGoods.
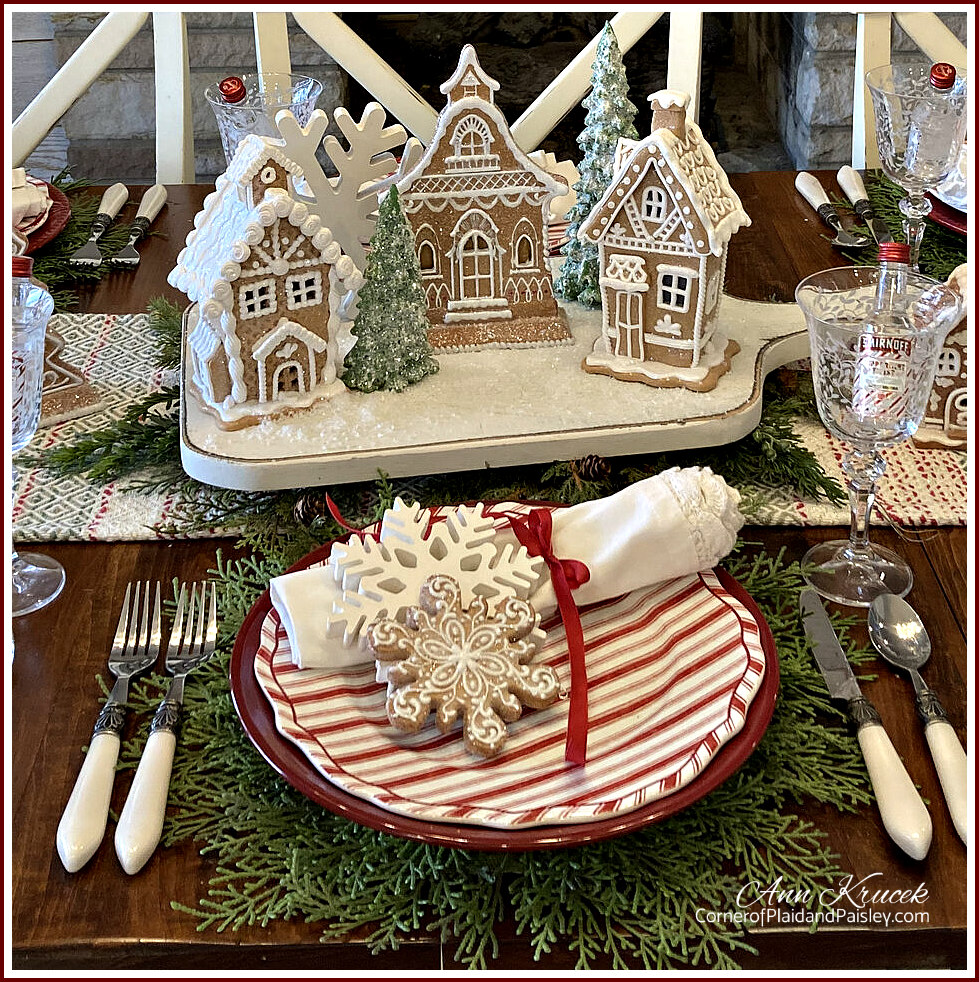
That same trip into HomeGoods, these three galvanized trees were screaming- take me home -too! 
I started visualizing this table at that moment when the tablecloth met the trees in my cart.
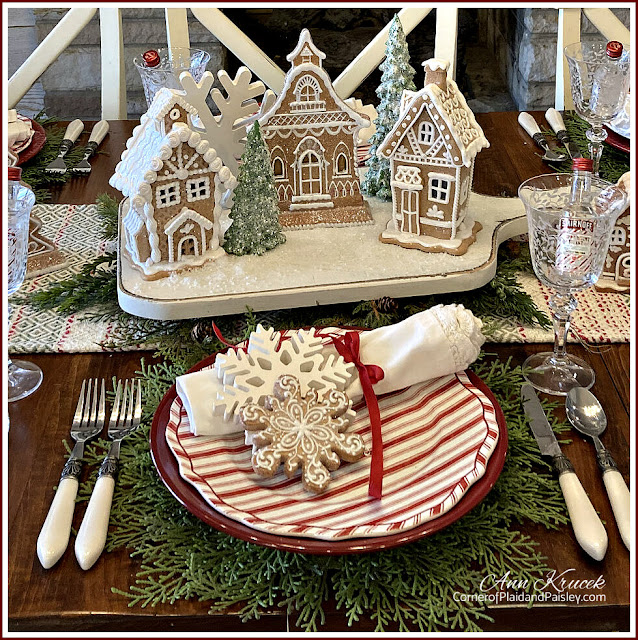
They were now on their way home to see if the dishes I had purchased at Marshall's several weeks prior would all go together.  I knew I would need a bit of a buffer between the busy tablecloth and the patterned rimmed dishes - so that is where the red stitched edge placemats and the wide rimmed galvanized chargers came into play.
A bell tops off the placesetting with a big red bow and some sprigs of greenery.
Some candles and greenery flanking my trees to make a runner as my centerpiece finished off the table.
Here are the links to all of the blogs participating in this weeks hop.  I hope you get a chance
to visit these wonderful bloggers for more inspiration. 


Wednesday

The Painted Apron | Calypso in the Country | Life and Linda | White Arrows Home

Thursday

Friday


I will be updating these links each day as their post comes up, so check back each day.
Now, It is on to putting up the trees!
I hope you enjoy decorating for this Christmas Season as much as I do!

sources:
tablecloth & napkins - April Cornell- HomeGoods
red placemats & galvanized trees - Homegoods
galvanized chargers - Joann Fabrics several years ago
dishes - Marshalls 
bells - Hobby Lobby
flatware - quite a few years ago - World Market
napkin rings - Target
stemware - years ago at Marshalls


Labels

#HoneyBeeStamps 3-d 3D 4th of july apple Autumn baby back to school Balloons Barbie Beer card bees birthday Birthday card birthday cards black and white Blending blog hop bloom boat boho bows brown bear buckeyes buffalo check bunnies camping candles candy Card cards Carrot Cake celebrate Cheese board cherries chickens chicks christmas cinco de mayo Cocoa Bar color congratulations cookies copper cows craft room crafternoon crafts daffodils daisies decor drinks dsp easter easter basket eggs embossing encouragement fall farm Farmers Market father's day favor featured fern fireplace fish fixer flag flowers football friend frog garden get well giftwrap gingerbread Gnome goat golf graduation greenery Halloween hawaiian hearts hello herbs holly hop hugs hyacinths Italian Kayak kitchen ladybug Lake house leaves love luau Magnolia makeover mantel masculine card Masks Mother's Day cards natural nautical nesting newyear note Nutcracker Ohio State Paper Pumpkin party patriotic peach pears pets plaid Plants projects pumpkins quilt Rae Dunn rainbow red white & blue remodel Renovation robin root beer sailboat Saleabration shabby chic shamrocks sheep slimline card snail mail snowflake spring sprinkling can squirr st patrick St Patrick's Day stamp set Stampin' Up Stampin' Up! Stamping Inkspirations Hop succulents summer sunflowers tablescape Taco tag thank you thanksgiving Thinking of you tiki hut travel Treat bag treat box tropical truck tulips valentines watermelon wedding well suited winter yellow yoga